繼上一篇瞭解了n8n是什麼之後,今天終於做了第一條自己的workflow,第一次做工作流想說不要太困難,先從簡單的開始做,我的需求是自動產出wordpress文章跟圖片,先讓文章發到要發佈的網站,存成草稿以便後續調整,圖片的部分先產出一張,存到google drive,用相對簡單的流程做出第一版,確定可以運作後再慢慢優化。
Workflow 整體架構
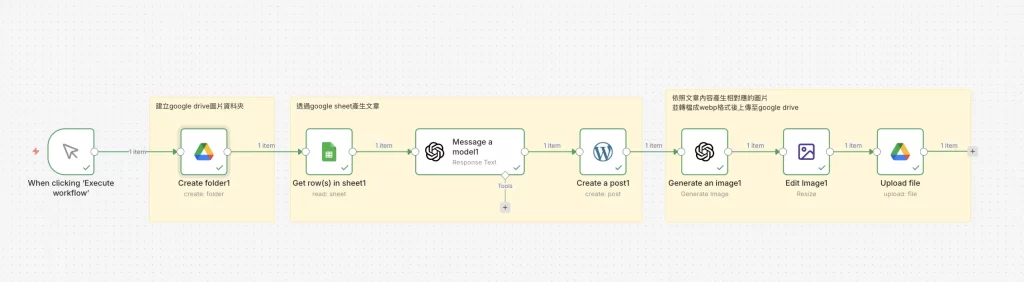
整個 workflow 的流程如下:
- 觸發器(手動或排程)
- Google Drive 建立資料夾(以當下日期時間命名)
- Google Sheets 讀取關鍵字與標題
- OpenAI GPT-4o 產出 SEO 文章
- WordPress 自動發文
- OpenAI DALL-E 3 產出圖片
- Edit Image 調整圖片
- 上傳圖片至對應資料夾
Step 1:建立 Google Drive 資料夾
在產文章之後加入 Google Drive Node,設定如下:
- Resource:選 Folder
- Operation:選 Create
- Folder Name:{{ $now }}
- Parent Folder:選你想放的根目錄資料夾
Step 2:設定 Google Sheets Node
欄位說明
- Credential:點 Create new,登入你的 Google 帳號
- Resource:選 Sheet Within Document
- Operation:選 Get Many Rows(讀取多列)
- Document:點資料夾圖示,選你的 Google Sheets 檔案
- Sheet:選對應的頁籤名稱,通常是「工作表1」
重要:往下找到 Options,點 Add Option,選 First Row as Headers 並打開。這樣 n8n 才能認得你的欄位名稱。
建議的 Sheet 欄位設計
- 關鍵字:例如「Taiwan travel eSIM」
- 標題:例如「2026年台灣旅遊eSIM完整指南」
- 狀態:填「待處理」或「完成」
- Drive連結:留空,之後自動回寫
- 處理時間:留空,之後自動回寫
Step 2:加入 Loop Over Items
在 Google Sheets Node 後面加入 Loop Over Items,這個 Node 不需要任何設定,加進來就好。
它有兩個出口:
- loop:每處理一列資料時走這條,產文章、產圖片都接在這裡
- done:所有列都跑完後才走這條,可以接通知(Gmail、Telegram)或留空
Step 3:OpenAI 產出 SEO 文章
欄位設定
- Credential:貼上你的 OpenAI API Key
- Resource:選 Text
- Operation:選 Message a Model
- Model:選 gpt-4o
Prompt 範例(英文、無 # 符號、1000字以上)
You are a professional SEO content writer. Please write a comprehensive, engaging, and SEO-optimized blog article in English based on the following information. Keyword: {{ $(‘Loop Over Items’).item.json[‘關鍵字’] }} Title: {{ $(‘Loop Over Items’).item.json[‘標題’] }} Requirements: – Minimum 1000 words – Use proper heading structure (H1, H2, H3) but do NOT use any # symbols – Include the keyword naturally throughout the article at least 8-10 times – Write an engaging introduction that hooks the reader – Include practical tips, detailed explanations, and real examples – Add a FAQ section at the end with 5 common questions and answers – End with a strong Call to Action – Write a Meta Description (under 150 characters) at the very end
Step 5:OpenAI DALL-E 3 產出圖片
欄位設定
- Resource:選 Image
- Operation:選 Generate an Image
- Model:選 dall-e-3
- Size:選 1792×1024(適合部落格橫幅)
- Quality:選 Standard
Prompt 範例
為以下主題產生一張適合部落格文章的專業配圖,風格簡潔明亮,不要有文字出現在圖片上。 主題:{{ $(‘Loop Over Items’).item.json[‘關鍵字’] }}
Step 6:上傳圖片至 Google Drive
在 Edit Image 後面加入 Google Drive Node,設定如下:
- Resource:選 File
- Operation:選 Upload
- Input Data Field Name:填 data(只有這四個字)
- File Name:{{ $(‘Loop Over Items’).item.json[‘關鍵字’] }}_{{ $now.format(‘yyyy-MM-dd’) }}.png
- Parent Folder:By ID,填 {{ $(‘Create Folder’).item.json.id }}
常見錯誤與解決方法
錯誤 1:binary file ‘data’ not found
原因:建立資料夾的 Node 插在 Edit Image 和上傳 Drive 中間,切斷了圖片資料的傳遞。
解決:把「建立資料夾」移到產圖片之前,而不是中間。順序應該是:建立資料夾 → 產圖片 → Edit Image → 上傳 Drive。
錯誤 2:File not found(資料夾 ID 找不到)
原因:Parent Folder 填了資料夾名稱,但 Google Drive 需要的是資料夾 ID。
解決:Parent Folder 改填 {{ $(‘Create Folder’).item.json.id }},這樣才能抓到正確的資料夾 ID。
錯誤 3:Input Data Field Name 填錯
原因:Input Data Field Name 填了 expression 語法或檔案路徑,而不是欄位名稱。
解決:只填 data 四個字,不需要加 {{ }} 或任何其他內容。
總結
整個 workflow 建立完成後,只要在 Google Sheets 填入關鍵字和標題,n8n 就會自動產出 SEO 文章、發布到 WordPress、建立 Drive 資料夾、產出圖片並上傳,完全不需要人工介入。
最重要的三個心得:
- Node 的順序非常重要,錯誤的順序會導致資料消失
- Parent Folder 一定要填 ID,不能填名稱
- Input Data Field Name 只填 data,不加任何語法